
Yesterday I got creative in the studio in a different way then usual. I have been seeing what I call word-banner-flag-things all over the crafty blog web.
Here are a few I have seen:
Kelly Rae Roberts
JC Handmade
Beauty That Moves
Soule Mama
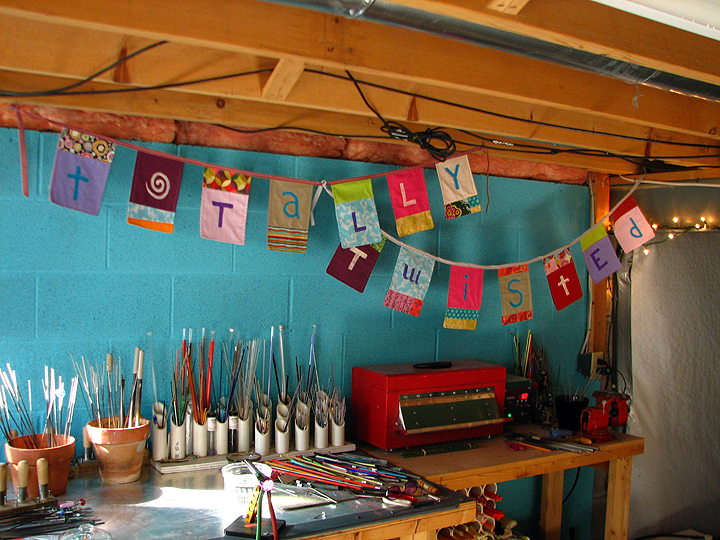
I knew I had to make one for the studio. "Totally Twisted" is what I call my 5 hour intro to wire class, and it is what I am hoping (fingers crossed, please, please, please) will be the title of my book. It is such a cool phrase (that I thunk up myself thankyouverymuch), I love it. It is mine all mine. Hey, maybe I better put a "Tm" after it? LOL.
It is an easy enough project to make and I threw together a quick tutorial for y'all. I don't know how anyone else makes these, and I am far from a master seamstress. I just winged it. I think these would be fun with an inspiration word like "bliss" or "create". I like mixing fabrics and colors and upper/lower case letters, but it would look just as cool if it was all the same fabric with the same text running across. I don't know exactly how much fabric I used. I did it a "stash buster" project just using up what I had around the house. (A while back, I bought an Anna Maria Horner Scrap Bag and it would be prefect for this.)
Without Further Ado..
Kab's Very Own Fabric Word Banner Flag Thingy
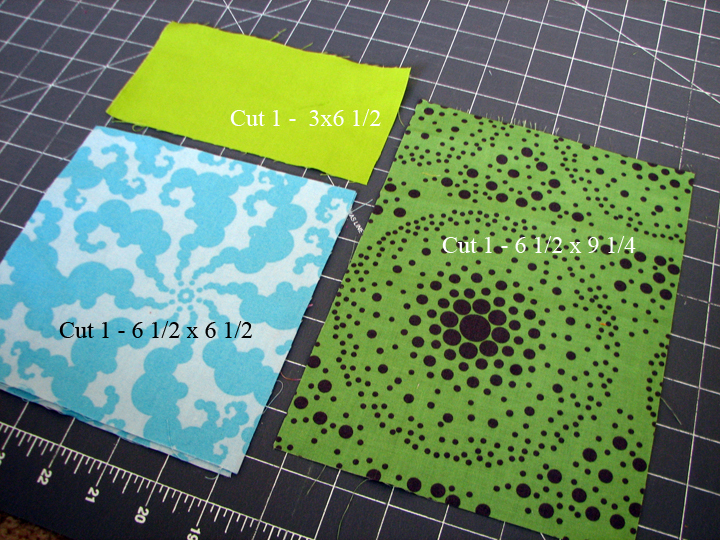
Step 1: You are basically going to make a bunch of little pouches. Straight line stitching people, nothing fancy. I made a plan ahead of time and knew I would need 14 flags for the letters in my words. You can do them assembly line style or one at a time. (I did 'em one at a timeand it too HOURS because my rotary cutter was about as sharp as a butter knife.) Cut three pieces of fabric (sizes to cut are on the photo above).
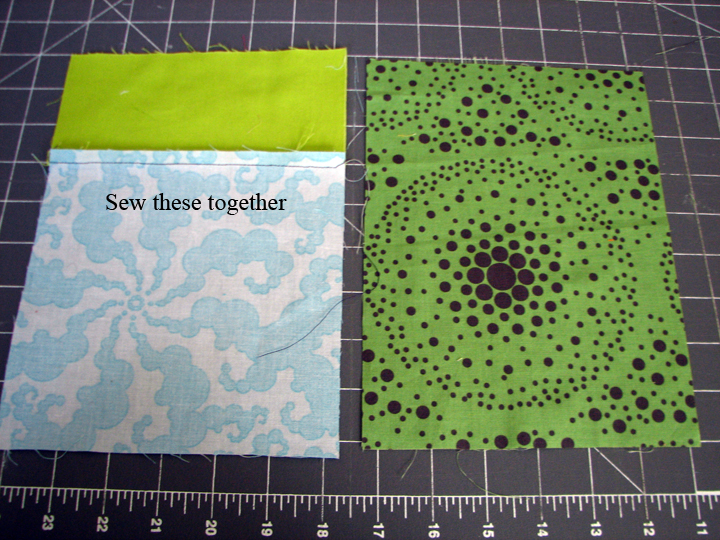
Step 2: With right sides together, sew together the two smaller pieces. This will be your "front". For the most part, all my letters are made on solid colors. This example has a patterned piece... if you want a pattern, make sure it is a light color and subtle so it is easier to paint and see the letter later on. Okay, the seam allowance is 1/4in (the outside edge of my presser foot). Be a good sewer girl and press your seams with an iron when you are done.

Step 3: Again, with right sides together, sew the front piece to the back piece. You only need to sew it on three sides, leave the top open. When you are done, flip it right side out and press it.

Step 4: You could leave the flag as is at this point, but I decided to add a little extra work for myself, um, I mean detail, by doing some top stitching. It is all machine done. I just went around the outside edge with a straight stitch then zigzagged the place where the two pieces were sewn earlier. This really is a stash buster project. I didn't worry about matching my thread to my bobbin. I ended up using whatever was in the machine... when my bobbin ran out, I just grabbed another half used one. Now I have three empty bobbins ready to be wound the next time I sew instead of 3 half full ones in colors I don't use very often.

Step 5: Keep on making the flags until you have as many as you need. I laid them out at I went so I could see how the colors were mixing. Have fun, move things around.

Step 6: Okay, I kinda skipped a step here, but well talk about the two steps shown in this photo. First, you need to sew the flags into some bias tape. Had it been a perfect studio day, I would have found two packages of black double fold bias tape in my stash, alas it was only a sorta good day. So, I ended up with being lucky enough just to find two packs of bias tape at all. Fold the tape in half to find the center and pin your center flap into the fold of the tape. Space the rest evenly along the tape and just sew a straight line down the bias tape.
Step 7: Now you can paint your letters!! I just used some acrylic paints I had in the studio. This isn't something that will be washed or played with so I didn't worry about using fabric paints. I just hand painted on the letters. Now, I bet you are thinking "Kerry, why didn't you paint the letters first, then sew them into the bias tape?" Well, if I did, there would be a chance I wasn't paying close enough attention and I would mix up the order of letters, then I would have to get out my seem ripper and destroy my bias tape. Just do it this way, it works. And ya know what is good about plain old acrylics? They dry in about 20mins!!

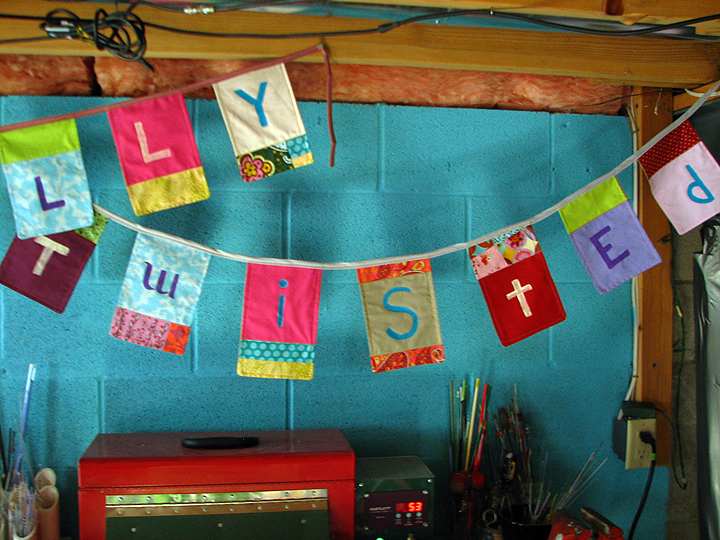
Hang it and enjoy!!
Besure to let me know if you bust up your fabric stash and give this a try. And remember, I just threw this together so typos and grammar errors are not my fault. Well, actually, they are my fault... I typed 'em... but hey, it is a free tutorial. Beggers can't be choosers.
Have fun!


8 comments:
kerry...this looks like a fun fun project...thanks so much for sharing this great idea...if i could only get my studio looking like a studio...you have inspired me this morning...
now to think...hmmm...
I love it! I too have been noticing the Tibetan Prayer Flag thingamabobs floating around. I feel some stash busting bunting in my future!
Kerry, You're the bomb! You always come up with the best ideas! Love the name, I hope it works out for the book. Always an inspiration!
K
What a FUN project! I love it and want to do it too....except I don't sew. HA!
This looks so much just like you, Kerry, with all the whizzbang colors, you are amazing. Thanks for sharing the inspiration!
Gosh if only I could sew. I like it!!!! The colors and everything. Now where do you find that time to make up tutorials like this...and the photos too. This really makes your studio extra bright and special. Totally Twisted it is!
absolutely fantastic!
I just have no idea how you do all you do.
You need to submit this to Cloth Paper Scissors!
Post a Comment